  1
  2
  3
  4
  5
  6
  7
  8
  9
 10
 11
 12
 13
 14
 15
 16
 17
 18
 19
 20
 21
 22
 23
 24
 25
 26
 27
 28
 29
 30
 31
 32
 33
 34
 35
 36
 37
 38
 39
 40
 41
 42
 43
 44
 45
 46
 47
 48
 49
 50
 51
 52
 53
 54
 55
 56
 57
 58
 59
 60
 61
 62
 63
 64
 65
 66
 67
 68
 69
 70
 71
 72
 73
 74
 75
 76
 77
 78
 79
 80
 81
 82
 83
 84
 85
 86
 87
 88
 89
 90
 91
 92
 93
 94
 95
 96
 97
 98
 99
100
101
102
103
104
105
106
107
108
109
110
111
112
113
114
115
116
117
118
119
120
121
122
123
124
125
126
127
128
129
130
131
132
133
134
135
136
137
138
139
140
141
142
143
144
145
146
147
148
149
150
151
| #![no_main]
#![no_std]
#[allow(unused_extern_crates)]
extern crate panic_halt;
extern crate cortex_m;
extern crate cortex_m_rt;
extern crate cortex_m_semihosting;
extern crate embedded_hal;
extern crate stm32f30x_hal as hal;
extern crate embedded_graphics;
extern crate ssd1331;
use hal::delay::Delay;
use hal::gpio::gpioa::PA9;
use hal::gpio::gpiob::PB6;
use hal::gpio::gpioc::PC7;
use hal::gpio::{Output, PushPull};
use hal::prelude::*;
use hal::spi::Spi;
use hal::stm32f30x;
use cortex_m_rt::entry;
use embedded_graphics::{
coord::Coord, fonts::Font6x8, pixelcolor::PixelColorU16, prelude::*, primitives::Circle,
primitives::Line, primitives::Rect, primitives::Triangle,
};
use embedded_hal::digital::v2::OutputPin;
use ssd1331::{prelude::*, Builder};
#[entry]
fn main() -> ! {
let cp = cortex_m::Peripherals::take().unwrap();
let p = stm32f30x::Peripherals::take().unwrap();
let mut flash = p.FLASH.constrain();
let mut rcc = p.RCC.constrain();
let clocks = rcc
.cfgr
.sysclk(64.mhz())
.hclk(64.mhz())
.pclk1(32.mhz())
.pclk2(32.mhz())
.freeze(&mut flash.acr);
let mut delay = Delay::new(cp.SYST, clocks);
let mut gpioa = p.GPIOA.split(&mut rcc.ahb);
let mut gpiob = p.GPIOB.split(&mut rcc.ahb);
let mut gpioc = p.GPIOC.split(&mut rcc.ahb);
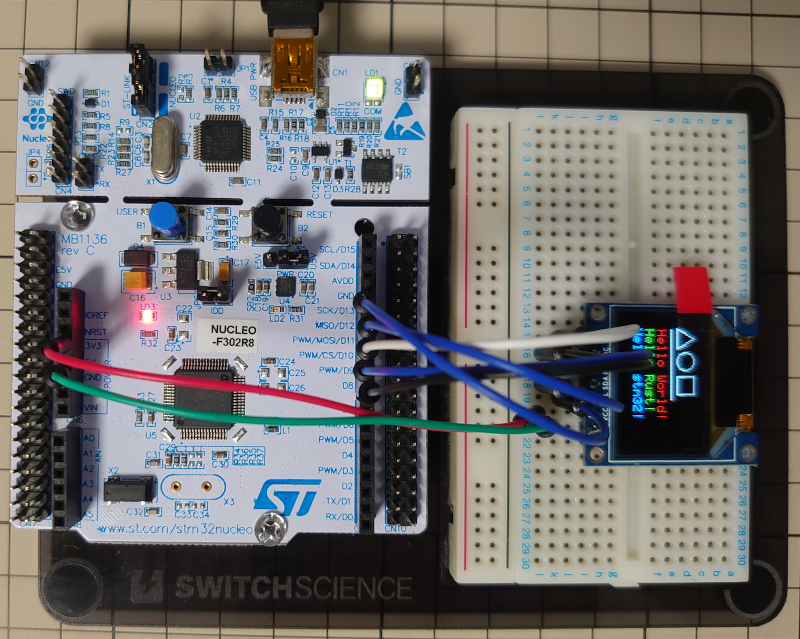
// OLED display SPI interface
let sck = gpiob.pb13.into_af5(&mut gpiob.moder, &mut gpiob.afrh);
let miso = gpiob.pb14.into_af5(&mut gpiob.moder, &mut gpiob.afrh);
let mosi = gpiob.pb15.into_af5(&mut gpiob.moder, &mut gpiob.afrh);
let spi = Spi::spi2(
p.SPI2,
(sck, miso, mosi),
embedded_hal::spi::Mode {
polarity: embedded_hal::spi::Polarity::IdleLow,
phase: embedded_hal::spi::Phase::CaptureOnFirstTransition,
},
8.mhz(),
clocks,
&mut rcc.apb1,
);
// OLED display CS, D/C, RESET pins
let mut oled_cs: PB6<Output<PushPull>> = gpiob
.pb6
.into_push_pull_output(&mut gpiob.moder, &mut gpiob.otyper);
let oled_dc: PA9<Output<PushPull>> = gpioa
.pa9
.into_push_pull_output(&mut gpioa.moder, &mut gpioa.otyper);
let mut oled_reset: PC7<Output<PushPull>> = gpioc
.pc7
.into_push_pull_output(&mut gpioc.moder, &mut gpioc.otyper);
let mut display: GraphicsMode<_> = Builder::new().connect_spi(spi, oled_dc).into();
// fall down to low the CS pin, activate the OLED display
OutputPin::set_low(&mut oled_cs).unwrap();
// initialize
display.reset(&mut oled_reset, &mut delay);
display.init().unwrap();
let color = PixelColorU16(0xffff_u16);
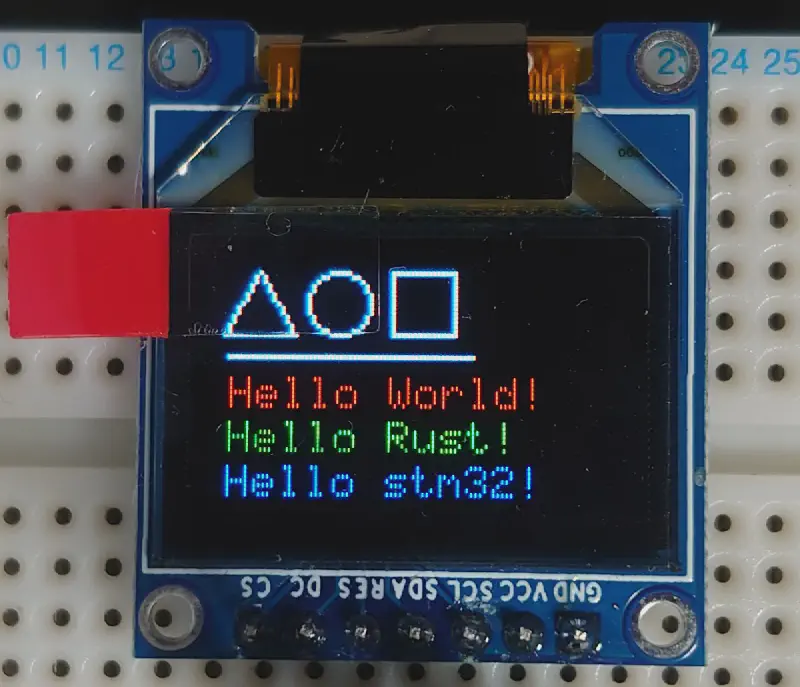
display.draw(
Triangle::new(Coord::new(4, 20), Coord::new(12, 6), Coord::new(20, 20))
.with_stroke(Some(color))
.with_stroke_width(3)
.into_iter(),
);
display.draw(
Circle::new(Coord::new(30, 13), 7)
.with_stroke(Some(color))
.with_stroke_width(1)
.into_iter(),
);
display.draw(
Rect::new(Coord::new(42, 6), Coord::new(42 + 14, 6 + 14))
.with_stroke(Some(color))
.with_stroke_width(1)
.into_iter(),
);
display.draw(
Line::new(Coord::new(5, 25), Coord::new(60, 25))
.with_stroke(Some(color))
.with_stroke_width(10)
.into_iter(),
);
display.draw(
Font6x8::render_str("Hello World!")
.with_stroke(Some(PixelColorU16(0xf800_u16)))
.with_stroke_width(2)
.translate(Coord::new(5, 30))
.into_iter(),
);
display.draw(
Font6x8::render_str("Hello Rust!")
.with_stroke(Some(PixelColorU16(0x07e0_u16)))
.with_stroke_width(2)
.translate(Coord::new(5, 40))
.into_iter(),
);
display.draw(
Font6x8::render_str("Hello stm32!")
.with_stroke(Some(PixelColorU16(0x001f_u16)))
.with_stroke_width(2)
.translate(Coord::new(5, 50))
.into_iter(),
);
display.flush().unwrap();
loop {}
}
|