現在の環境 1
2
3
4
5
6
7
8
9
10
11
12
13
% cat /etc/redhat-release
CentOS Linux release 7.3.1611 ( Core)
% /usr/libexec/mysqld --version
/usr/libexec/mysqld Ver 5.5.52-MariaDB for Linux on x86_64 ( MariaDB Server)
% nginx -v
nginx version: nginx/1.12.1
% php-fpm -v
PHP 5.4.16 ( fpm-fcgi) ( built: Nov 6 2016 00:30:57)
Copyright ( c) 1997-2013 The PHP Group
Zend Engine v2.4.0, Copyright ( c) 1998-2013 Zend Technologies
Copy PHP5.4から早いと噂のPHP7に移行したいが、CentOSの公式リポジトリはPHP5.4なのでCentOSをやめてUbuntuに移行します。
このサーバーは過去に手作業で構築して、1日では終わらなかった ので今回は自動化を試してみます。
サーバー構築の自動化 サーバープロビジョニングツールとしてAnsible を採用します
このサイト用に作ったPlaybookはGitHubからどうぞ。https://github.com/ak1211/wordpress-nginx-letsencrypt
このPlaybookの使いかた productionファイル 内の[webserver]の次行に自分のサーバーを 上書き group_vars/all.yml ファイル内の設定をこの説明にしたがって 上書き
 1
 2
 3
 4
 5
 6
 7
 8
 9
10
11
12
13
14
15
16
17
18
19
20
21
22
23
24
25
26
27
---
tls_domains :
- ここに Let's Encript 認証局で証明書をもらうドメインを入れる
- 複数有ればここにも入れられる
admin_email : ここに Let's Encript 認証局に提出する管理者のメールアドレスを入れる
mariadb :
root_password : "BadP@ssw0rd"
# root_password: 上のようなバッドパスワードはやめておこうな
wordpress :
version : 4.8.2
checksum : sha1:a99115b3b6d6d7a1eb6c5617d4e8e704ed50f450
# WordPress DB の name と user は 好きにどうぞ
db_name : wordpressdb
db_user : wordpress
db_password : "BadP@ssw0rd"
# db_password: 上のようなバッドパスワードはやめておこうな
# 以下の設定は好きにどうぞ
nginx :
webroot : /var/www
owner : www-data
group : www-data
listen : /run/php/php7.0-fpm.sock
fastcgi_pass : unix:/run/php/php7.0-fpm.sock
Copy インストールするWordPressは WordPress.orgのダウンロードページ から選んでから、そのsha1チェックサムをchecksumに書いてください。
(これはWordPress日本語版ではないけれど、サーバーの移行なので移行前のWordPressフォルダをそのまま移動させて使うから気にしない)
サーバー鍵を用意する 自分は~/.ssh/にある旧サーバーの鍵をそのまま使うので、この作業は不要
Ansible をインストール
ホストOSは Bash on Ubuntu on Windows 10 だから Ansibleの公式サイトに書かれている通り に最新版(latest release)をインストールする
1
2
3
4
5
$ sudo apt-get update
$ sudo apt-get install software-properties-common
$ sudo apt-add-repository ppa:ansible/ansible
$ sudo apt-get update
$ sudo apt-get install ansible
Copy 1
2
3
4
5
6
7
$ ansible --version
ansible 2.4.0.0
config file = /etc/ansible/ansible.cfg
configured module search path = [ u'/root/.ansible/plugins/modules' , u'/usr/share/ansible/plugins/modules' ]
ansible python module location = /usr/lib/python2.7/dist-packages/ansible
executable location = /usr/bin/ansible
python version = 2.7.6 ( default, Oct 26 2016, 20:30:19) [ GCC 4.8.4]
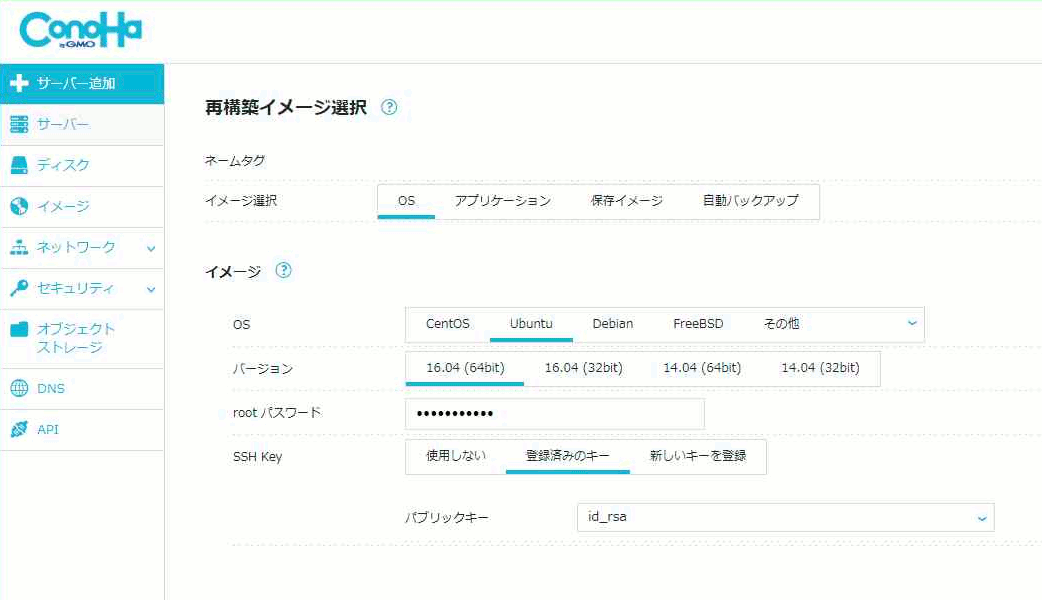
Copy 移行対象のサーバーを用意する 初期費用が不要だったので今回は ConoHa のサーバーイメージからUbuntu Server を用意する。
イメージ Ubuntu rootパスワード SSH Key この画像に無いけど接続許可ポートで こんな感じでぽちぽちとすると25秒(公式サイトによる)で出来るので、出来てからサーバーを起動する。(待ち時間が不足するとエラーになるから注意して)
ドメインを用意する サーバーのipアドレスが受け取れたら、DNSに適当に設定して名前解決出来るように設定しておく。
rootログインとパスワード認証の禁止設定から サーバーが起動したらBash on Ubuntu On Windows 10コンソールから
1
2
$ ssh-agent bash
$ ssh-add
Copy SSH Agentにサーバー鍵を渡して、ansible-playbookを実行する。
1
2
3
$ ansible-playbook ansible-user-setup.yml -i production
PLAY [ all] ***********************************************************************************************************
省略
Copy developing, staging環境?そんなもん用意していないのでいきなりproduction環境を変更する。
新規作成サーバだから何回ぶち壊しても大丈夫、問題ない。
ansible-user-setup.ymlというのはこれ
1
2
3
4
5
6
7
8
9
---
hosts : all
remote_user : root
vars :
setup_user :
name : ansibleuser
pubkey : "{{ lookup('env','HOME') + '/.ssh/id_rsa.pub' }}"
roles :
- role : ansible-user-setup
Copy ここでの作業は roles/ansible-user-setup/tasks/main.yml にかいてある通りです。
今回だけrootでログインして以下の作業を行なうので、次回からこの作業は出来ない。(もう必要ない)
ansible 実行ユーザーの作成 ansible 実行ユーザーの公開鍵をリモートサーバーへ送る ansible 実行ユーザーはパスワード無しで sudo 出来るようにする このサーバーのホスト名を設定する このサーバーはパスワード認証を禁止して公開鍵認証のみにする このサーバーはrootログインを禁止する Webサーバーの構築 これからWordPress, Nginx, MariaDB, PHP7.0 FPM, Let’s Encrypt のインストールと設定をします。
1
2
3
4
5
6
7
8
9
10
11
12
13
14
$ ansible-playbook site.yml -i production
PLAY [ Install WordPress, MariaDB, Nginx, and PHP-FPM] ****************************************************************
TASK [ Gathering Facts] ***********************************************************************************************
ok: [ conoha.ak1211.com]
TASK [ common : 基本パッケージをインストールする] *************************************************************************************
ok: [ conoha.ak1211.com] = > ( item =[ u'apparmor-profiles' , u'apparmor-utils' , u'ufw' , u'language-pack-ja' , u'zsh' , u'git' , u'vim' , u'tmux' , u'htop' , u'tree' , u'curl' , u'wget' , u'rsync' , u'fail2ban' ])
TASK [ common : タイムゾーンを Asia/Tokyo にする] *******************************************************************************
ok: [ conoha.ak1211.com]
PLAY [ all] ***********************************************************************************************************
省略
Copy 作業はAnsibleがするから、このまま放置して休憩でもしてこよう。
Webサーバー構築作業の実際 site.yml の通りにansibleuserでログインして以下に箇条書きした作業をAnsibleが行ないます。
common mariadb nginx letsencrypt php-fpm wordpress common role roles/common/tasks/main.yml
基本パッケージをインストールする タイムゾーンを Asia/Tokyo にする エディタをvimにする ファイアウォールを設定する fail2ban 設定ファイル を配置する引っかかったら管理者にメールする設定 fail2ban サービスを起動する 標準の nano エディタはつかいにくいのでエディタは vim にしました。 mariadb role roles/mariadb/tasks/main.yml
MariaDB パッケージをインストールする MariaDB の設定をする MariaDB サービスを起動する MariaDB の root アカウントのパスワードを設定する ローカル側に ~/.my.cnf を配置する nginx role roles/nginx/tasks/main.yml
必要なパッケージをインストールする WordPress用 Nginx 設定ファイルを配置する TCP ポート 80 / 443 (http / https) を開く nginx サービスを起動する letsencrypt role roles/letsencrypt/tasks/main.yml
必要なパッケージをインストールする /usr/local/ssl/ を用意する Let’s Encrypt 用秘密鍵を作る dhparam.pem を作る http-01 証明 用のディレクトリを用意するhttp-01 証明 用のファイルが外部から見えるように設定するNginx を再起動する roles/letsencrypt/tasks/cert.ymlに処理を振る 使用済みの Nginx 設定ファイルを削除する 鍵は普通 /etc/ssl/ に置くだろうけれども、今回は /usr/local/ssl/ にしました。
Let’s Encrypt公式のCertbotでは無く、Ansible のLet’s Encrypt モジュール でサーバ証明書を取得する手続きのために、Let’s Encrypt の仕組み をよく読んでおいて。
実際にこの流れでサーバ証明書を取得します。
roles/letsencrypt/tasks/cert.yml
ドメインの秘密鍵を作る 秘密鍵から証明書署名要求 (CSR) を作る 証明書署名要求を Let’s Encrypt 認証局に提出する http-01 証明用のディレクトリに証明用のファイルを配置する Let’s Encrypt 認証局に http-01 証明の検証を依頼する ドメインの設定ファイル を配置するhttp://domain /.well-known/acme-challenge/ をつうつうにする設定と常時SSL, fastcgiをunixソケット通信でする設定
Ansible のLet’s Encrypt モジュールの例の通りサーバー証明書を取得する
php-fpm role roles/php-fpm/tasks/main.yml
php-fpm パッケージをインストールする WordPress 用 php の設定をする WordPress, Nginx 用 php-fpm の設定をする wordpress role roles/wordpress/tasks/main.yml
必要なパッケージをインストールする WordPress データーベースを作成する WordPress データーベースユーザーを作成する 作業用のディレクトリを作る WordPress のダウンロード WordPress を webroot /wordpress へ配置する wordpress.org の秘密鍵生成サービスから認証キーを得る webroot /wordpress/wp-config.php の設定をする wordpress フォルダの所有権を設定する 作業が終了するまで、休憩。
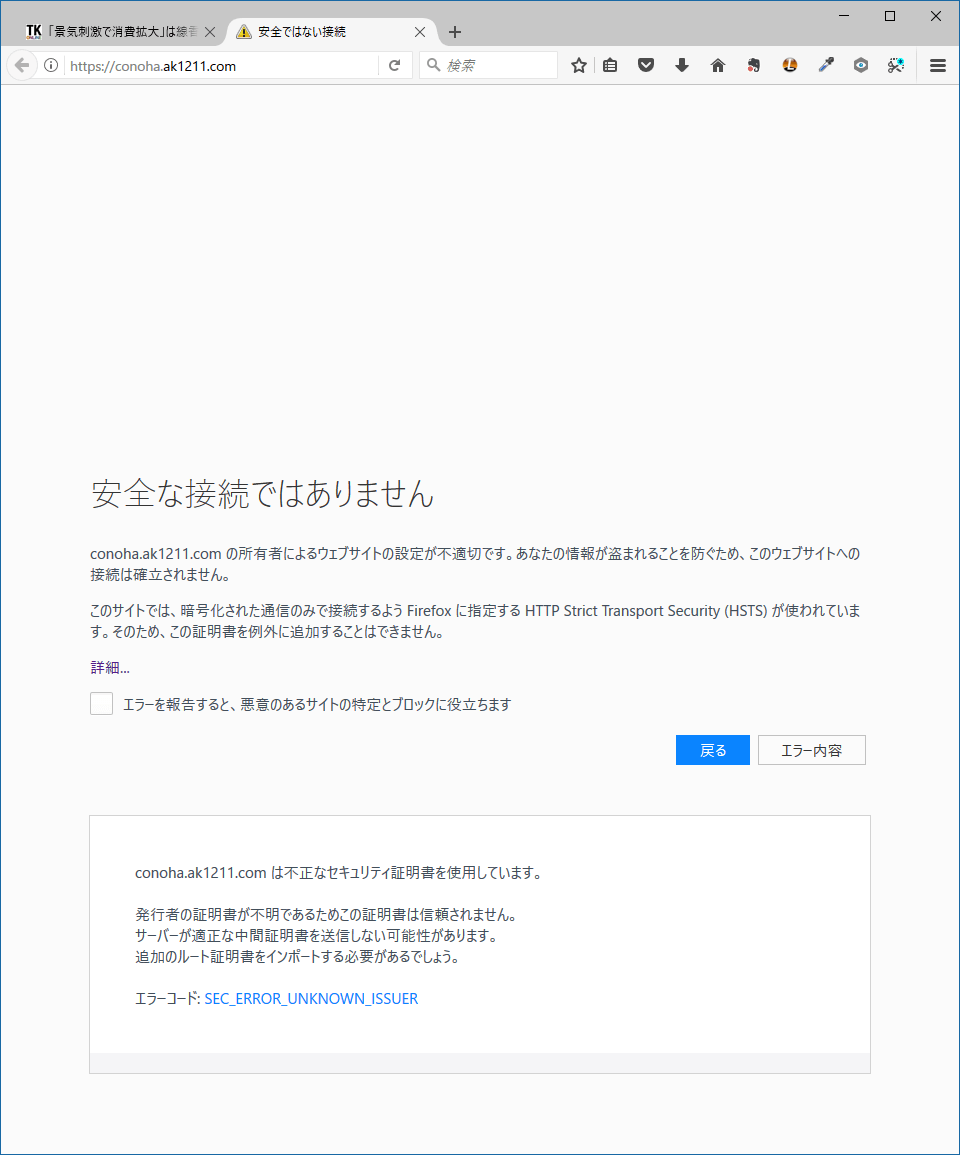
ブラウザでWEBサーバーにアクセス はいっ。この通り。
安全な接続ではありません
不正なセキュリティ証明書を使用しています。
こうなることは知ってたから。問題あるけど問題ないから。
roles/letsencrypt/tasks/cert.yml を見るとacme_directoryをコメントアウトしているでしょ。
Ansible のLet’s Encrypt モジュールの説明を確認すると
The ACME directory to use. This is the entry point URL to access CA server API. For safety reasons the default is set to the Let’s Encrypt staging server. This will create technically correct, but untrusted certificates.
acme_directoryの設定が無ければ、安全のためにstagingサーバーから証明書をもらってくるで。信頼できない証明書だけどかんにんな。(こんなアトモスフィアを感じた)
https://letsencrypt.org/docs/staging-environment/ によると
こういう証明書チェーンになるようだ。
原因が分かったのでacme_directoryのコメントアウトを解除して(全部で2カ所有るacme_directory先頭の#を消して)
サーバー構築をもう一度 もちろんletsencrypt roleだけ実行すればいいんだけれども、Ansibleを使っているので自動化の恩恵を感じてみたい。
そこでこの未完成サーバーをConoHaのコンソールから停止 – 再構築と順番にクリックして、このページの最初からサーバーの構築をする。
構築後にサーバーにsshで入ると *** System restart required *** が出ているから
1
2
$ sudo apt-get dist-upgrade
$ sudo reboot
Copy をしておくといいかもしれない。(再起動すると /tmp が片付くしね)
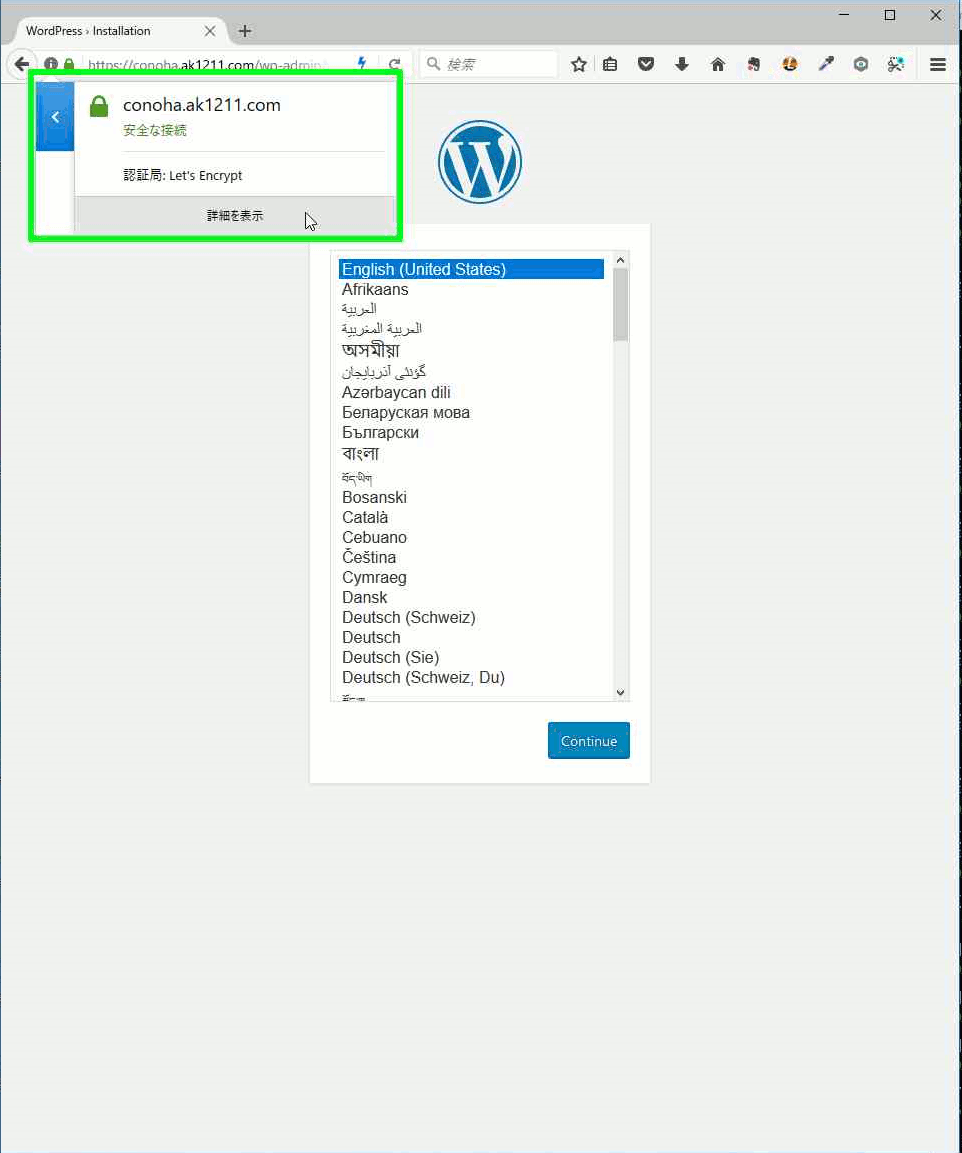
ブラウザでWEBサーバーにアクセス(2度目)
image Let’s Encrypt 認証局発行の証明書を受け取れた
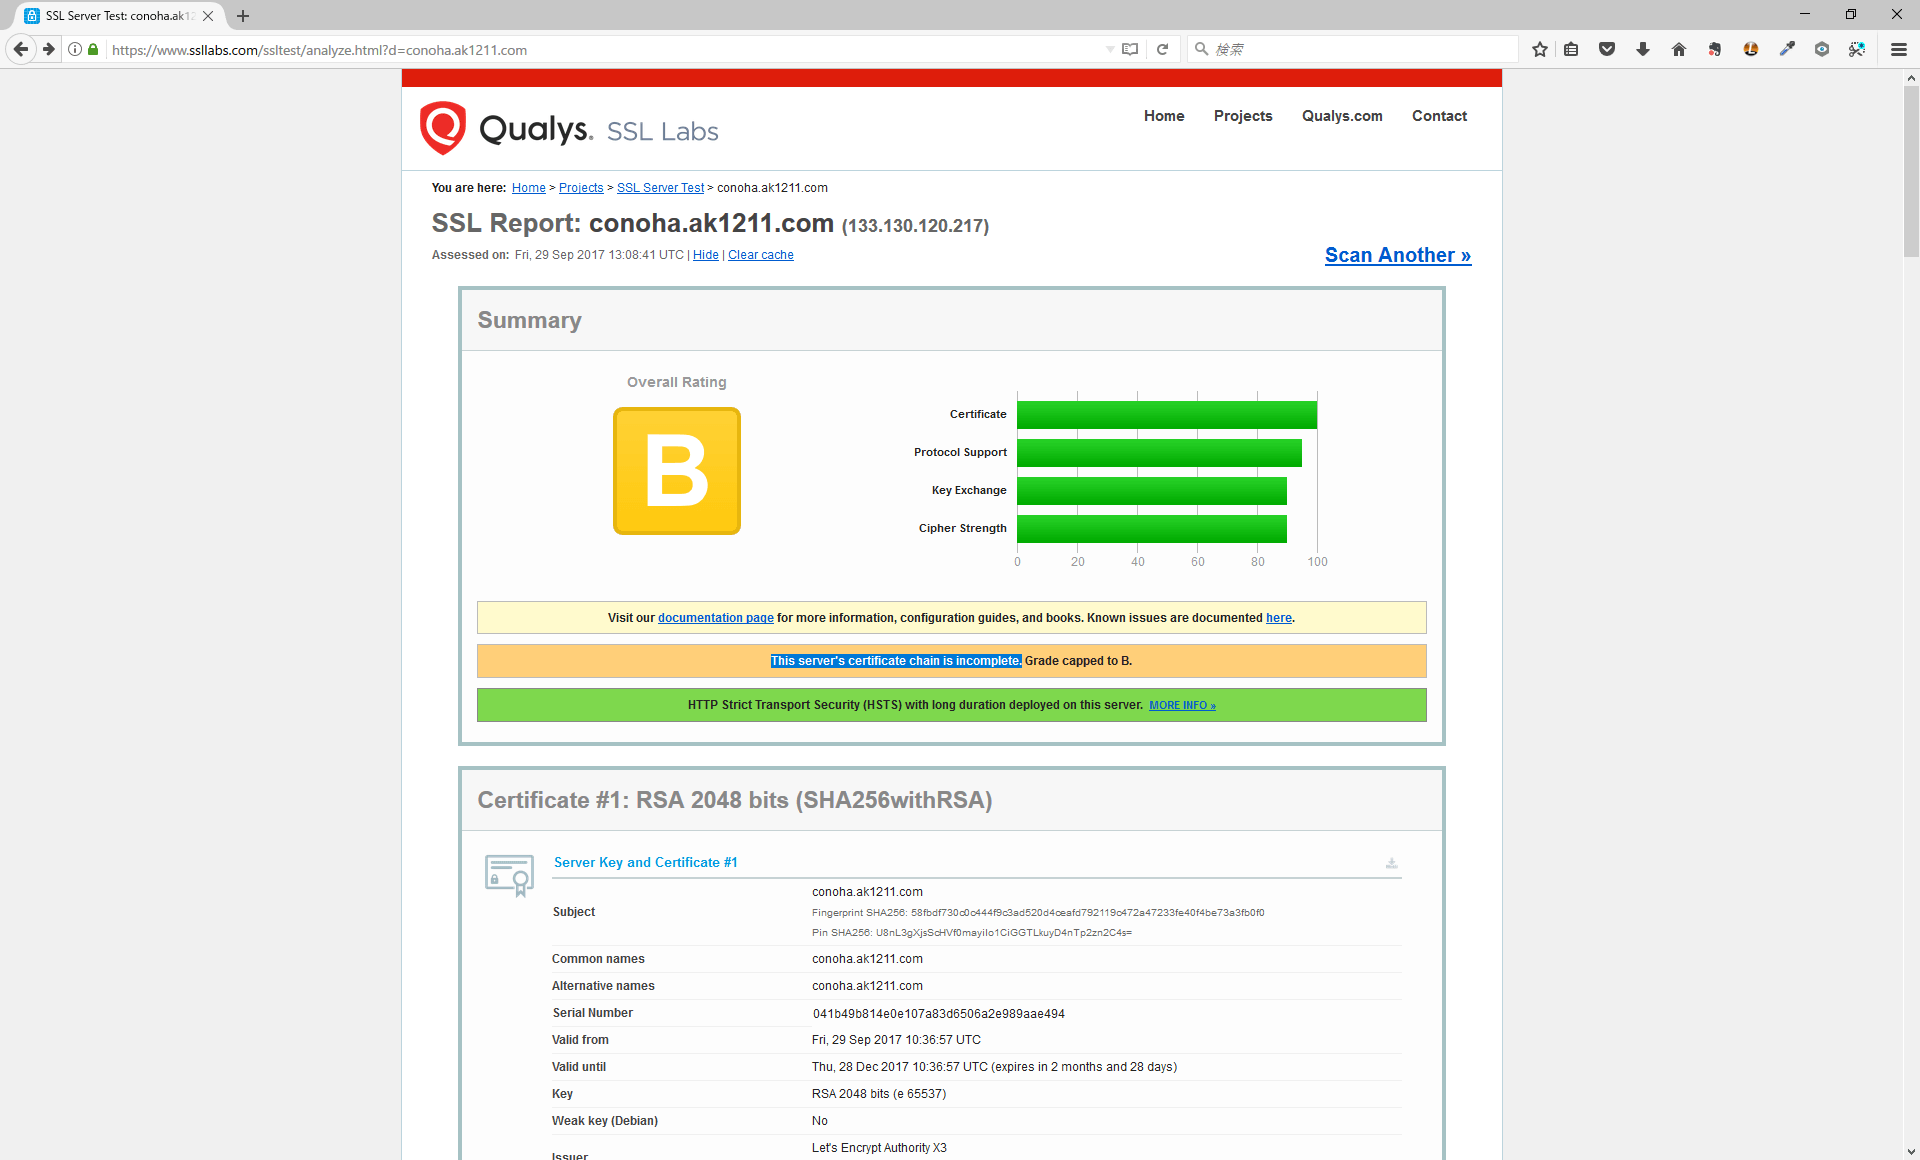
SSLのテスト 正しく設定が出来たようなので、SSLサーバーテストサイトSSL Server Test (Powered by Qualys SSL Labs)
旧サーバーの評価はA+なので今回もA+な
…はぁ?でも理由が書いてあるけどね
This server’s certificate chain is incomplete. Grade capped to B.
不足している中間証明書を探して
証明書チェーン 証明書の階層を確認すると、ルート証明書はブラウザに自サイトの証明書はサーバーにあるので、不足している証明書は
Let’s Encrypt Authority X3証明書
これは https://letsencrypt.org/certificates/ ページにリンクがある
証明書を結合してfullchain.pemを用意する 1
2
3
4
5
6
7
8
9
10
11
12
13
14
15
16
17
18
19
20
21
22
23
24
25
26
27
28
29
30
31
32
33
34
35
36
37
38
39
40
41
42
43
Welcome to Ubuntu 16.04.3 LTS ( GNU/Linux 4.4.0-96-generic x86_64)
* Documentation: https://help.ubuntu.com
* Management: https://landscape.canonical.com
* Support: https://ubuntu.com/advantage
0 packages can be updated.
0 updates are security updates.
ansibleuser@conoha:~$ cd /usr/local/ssl/
ansibleuser@conoha:/usr/local/ssl$ ll
total 28
drwxr-xr-x 2 root root 4096 Oct 2 03:13 ./
drwxr-xr-x 11 root root 4096 Sep 29 21:59 ../
-rw-r--r-- 1 root root 1801 Sep 29 21:59 conoha.ak1211.com-cert.pem
-rw-r--r-- 1 root root 985 Sep 29 21:59 conoha.ak1211.com.csr
-rw-r--r-- 1 root root 1704 Sep 29 21:59 conoha.ak1211.com-key.pem
-rw-r--r-- 1 root root 424 Sep 29 21:59 dhparam.pem
-rw-r--r-- 1 root root 1704 Sep 29 21:59 letsencrypt-key.pem
ansibleuser@conoha:/usr/local/ssl$ sudo wget https://letsencrypt.org/certs/lets-encrypt-x3-cross-signed.pem.txt
ansibleuser@conoha:/usr/local/ssl$ sudo cat conoha.ak1211.com-cert.pem lets-encrypt-x3-cross-signed.pem.txt > conoha.ak1211.com-fullchain.pem
ansibleuser@conoha:/usr/local/ssl$ ll
total 36
drwxr-xr-x 2 root root 4096 Oct 2 03:14 ./
drwxr-xr-x 11 root root 4096 Sep 29 21:59 ../
-rw-r--r-- 1 root root 1801 Sep 29 21:59 conoha.ak1211.com-cert.pem
-rw-r--r-- 1 root root 985 Sep 29 21:59 conoha.ak1211.com.csr
-rw-r--r-- 1 root root 3448 Sep 29 22:28 conoha.ak1211.com-fullchain.pem
-rw-r--r-- 1 root root 1704 Sep 29 21:59 conoha.ak1211.com-key.pem
-rw-r--r-- 1 root root 424 Sep 29 21:59 dhparam.pem
-rw-r--r-- 1 root root 1704 Sep 29 21:59 letsencrypt-key.pem
-rw-r--r-- 1 root root 1647 Nov 17 2016 lets-encrypt-x3-cross-signed.pem.txt
ansibleuser@conoha:/usr/local/ssl$ sudo vim /etc/nginx/sites-available/conoha.ak1211.com
*** 今作ったfullchain.pemを使うように編集 ***
ansibleuser@conoha:/usr/local/ssl$ sudo nginx -t
nginx: the configuration file /etc/nginx/nginx.conf syntax is ok
nginx: configuration file /etc/nginx/nginx.conf test is successful
ansibleuser@conoha:/usr/local/ssl$ sudo service nginx restart
Copy SSLのテスト(2回目)
servertest “A+” 合格です。
crt.shで確認してみよう ついでに https://crt.sh/ で状況を確認してみる。
image 記録は公開されていて、ドメインがきちんと登録されている事が分かる。
Ansibleを活用してのサーバー構築はここまで。
WordPressを移行する WordPressの移行作業は、旧サーバーから
を新サーバーへ手作業で移します。
旧サーバーからデーターベースを移行する 新サーバーから旧サーバーへとSSH接続して
mysqldump コマンドでデータベースの全てをsql.gzファイルにしてダウンロードする。 ダンプしたファイルを新サーバーのデーターベースに入れる。 1
2
ansibleuser@conoha:~$ ssh username@beforehost.com "mysqldump -uroot -p -A | gzip" > all-tables-dump.sql.gz
ansibleuser@conoha:~$ zcat all-tables-dump.sql.gz | sudo mysql -uroot -p
Copy 旧サーバーからWordPressを移行する 新サーバーから旧サーバーへとSSH接続して tar コマンドでwordpressディレクトリの全てをtgzファイルにしてダウンロードする 作業ディレクトリの移動 旧サーバーのWordPressを移行して使うから Ansibleでインストールした新しいWordPressは消す。 ダウンロードしてきたファイルを tar コマンドで展開する。 owner / group を www-data にする。 1
2
3
4
5
ansibleuser@conoha:~$ ssh username@beforehost.com "sudo -S tar zcf - -C /var/www wordpress" > wp.tgz
ansibleuser@conoha:~$ cd /var/www
ansibleuser@conoha:/var/www$ sudo rm -r wordpress/
ansibleuser@conoha:/var/www$ sudo tar zxf /home/ansibleuser/wp.tgz
ansibleuser@conoha:/var/www$ sudo chown -R www-data:www-data wordpress
Copy 旧サーバーからダウンロードしたファイルはバックアップ目的に残しておいてもいいですし、消してもいいです。この手順がWordPressのバックアップ/復元の手順だから。(ただしWordPress以外の全テーブルが入っている事に注意して)
WordPressの移行はこれで終わり。サーバーを再起動しておく。
 1
 2
 3
 4
 5
 6
 7
 8
 9
10
11
12
13
14
15
16
17
18
19
20
21
22
23
24
25
26
27
Welcome to Ubuntu 16.04.3 LTS ( GNU/Linux 4.4.0-96-generic x86_64)
* Documentation: https://help.ubuntu.com
* Management: https://landscape.canonical.com
* Support: https://ubuntu.com/advantage
0 packages can be updated.
0 updates are security updates.
ansibleuser@conoha:~$ cat /etc/lsb-release
DISTRIB_ID = Ubuntu
DISTRIB_RELEASE = 16.04
DISTRIB_CODENAME = xenial
DISTRIB_DESCRIPTION = "Ubuntu 16.04.3 LTS"
ansibleuser@conoha:~$ mysqld --version
mysqld Ver 10.0.31-MariaDB-0ubuntu0.16.04.2 for debian-linux-gnu on x86_64 ( Ubuntu 16.04)
ansibleuser@conoha:~$ nginx -v
nginx version: nginx/1.10.3 ( Ubuntu)
ansibleuser@conoha:~$ php-fpm7.0 -v
PHP 7.0.22-0ubuntu0.16.04.1 ( fpm-fcgi)
Copyright ( c) 1997-2017 The PHP Group
Zend Engine v3.0.0, Copyright ( c) 1998-2017 Zend Technologies
with Zend OPcache v7.0.22-0ubuntu0.16.04.1, Copyright ( c) 1999-2017, by Zend Technologies
Copy 新旧サーバーのベンチマーク 新サーバー(移行後) 1
2
3
4
5
6
7
8
9
10
11
12
13
14
15
16
17
18
19
20
21
22
23
24
25
26
27
28
29
30
31
32
33
34
35
36
37
38
39
40
41
42
43
44
$ ab -n 100 -c 100 https://conoha.ak1211.com/
This is ApacheBench, Version 2.3 <$Revision : 1528965 $>
Copyright 1996 Adam Twiss, Zeus Technology Ltd, http://www.zeustech.net/
Licensed to The Apache Software Foundation, http://www.apache.org/
Benchmarking conoha.ak1211.com ( be patient) .....done
Server Software: nginx/1.10.3
Server Hostname: conoha.ak1211.com
Server Port: 443
SSL/TLS Protocol: TLSv1.2,ECDHE-RSA-AES128-GCM-SHA256,2048,128
Document Path: /
Document Length: 51482 bytes
Concurrency Level: 100
Time taken for tests: 6.706 seconds
Complete requests: 100
Failed requests: 0
Total transferred: 5175900 bytes
HTML transferred: 5148200 bytes
Requests per second: 14.91 [ #/sec] (mean)
Time per request: 6705.766 [ ms] ( mean)
Time per request: 67.058 [ ms] ( mean, across all concurrent requests)
Transfer rate: 753.77 [ Kbytes/sec] received
Connection Times ( ms)
min mean[ +/-sd] median max
Connect: 137 827 413.8 824 1524
Processing: 161 2771 1506.1 2796 5153
Waiting: 114 2625 1484.9 2639 5091
Total: 763 3598 1550.5 3683 6266
Percentage of the requests served within a certain time ( ms)
50% 3683
66% 4382
75% 4628
80% 5309
90% 5673
95% 6144
98% 6264
99% 6266
100% 6266 ( longest request)
Copy 旧サーバー(移行前) 1
2
3
4
5
6
7
8
9
10
11
12
13
14
15
16
17
18
19
20
21
22
23
24
25
26
27
28
29
30
31
32
33
34
35
36
37
$ ab -n 100 -c 100 https://ak1211.com/
This is ApacheBench, Version 2.3 <$Revision : 1528965 $>
Copyright 1996 Adam Twiss, Zeus Technology Ltd, http://www.zeustech.net/
Licensed to The Apache Software Foundation, http://www.apache.org/
Benchmarking ak1211.com ( be patient) .....done
Server Software: nginx/1.12.1
Server Hostname: ak1211.com
Server Port: 443
SSL/TLS Protocol: TLSv1.2,ECDHE-RSA-AES128-GCM-SHA256,2048,128
Document Path: /
Document Length: 51434 bytes
Concurrency Level: 100
Time taken for tests: 47.292 seconds
Complete requests: 100
Failed requests: 0
Total transferred: 5172800 bytes
HTML transferred: 5143400 bytes
Requests per second: 2.11 [ #/sec] (mean)
Time per request: 47291.552 [ ms] ( mean)
Time per request: 472.916 [ ms] ( mean, across all concurrent requests)
Transfer rate: 106.82 [ Kbytes/sec] received
Connection Times ( ms)
min mean[ +/-sd] median max
Connect: 238 3022 1799.0 2926 5893
Processing: 12183 30564 9891.0 33408 41375
Waiting: 7767 23919 12227.8 27808 39089
Total: 14434 33585 10085.6 34014 47193
Percentage of the requests served within a certain time ( ms)
50% 34014
66% 41942
75% 43359
80% 44335
90% 46074
95% 46902
98% 47173
99% 47193
100% 47193 ( longest request)
Copy 改善点 移行後 移行前 毎秒 14.91 リクエスト / 毎秒 2.11 リクエスト = 7.06倍の改善。
お疲れさまでした PHP7は体感でも早くなっていることが分かる。