
自分のサーバー管理とWordPress学習用にさくらのVPS512プランで立ち上げたサイトで1年間CentOS6,Apache,WordPressの構成で運用というか放置していました。
SSL/TLS証明書を無料で取得できるLet’s Encriptが2016年4月12日に正式サービスが開始したので CentOS7,nginx環境に移行するついでに常時SSLにしてみた記録です。
アップグレードツールは?
CentOS in-place upgrade tool is broken, please don’t use this in your production server!
なんか怖いことが書いてある。
旧サイトのバックアップから
やっぱりアップグレードツールでこける
% sudo preupg

Preupg tool doesn't do the actual upgrade.
Please ensure you have backed up your system and/or data in the event of a failed upgrade
 that would require a full re-install of the system from installation media.
Do you want to continue? y/n
y
Gathering logs used by preupgrade assistant:
All installed packages : 01/11 ...running         finished (time 00:02s)
All changed files      : 02/11 ...running         finished (time 02:08s)
Changed config files   : 03/11 ...running         finished (time 00:00s)
All users              : 04/11 ...running         finished (time 00:00s)
All groups             : 05/11 ...running         finished (time 00:00s)
Service statuses       : 06/11 ...running         finished (time 00:00s)
All installed files    : 07/11 ...running         finished (time 00:03s)
All local files        : 08/11 ...running         finished (time 00:12s)
All executable files   : 09/11 ...running         finished (time 00:12s)
RedHat signed packages : 10/11 ...running         finished (time 00:00s)
CentOS signed packages : 11/11 ...running         finished (time 00:00s)
Assessment of the system, running checks / SCE scripts:
001/096 ...running (Configuration Files to Review)                                       done    (Configuration Files to Review)

長いので省略

096/096 ...running (NIS server config file back-up)                                        done    (NIS server config file back-up)
Assessment finished (time 03:06s)
I/O warning : failed to load external entity "/usr/share/openscap/xsl/security-guide.xsl"
compilation error: file /usr/share/preupgrade/xsl/preup.xsl line 40 element import
xsl:import : unable to load /usr/share/openscap/xsl/security-guide.xsl
I/O warning : failed to load external entity "/usr/share/openscap/xsl/oval-report.xsl"
compilation error: file /usr/share/preupgrade/xsl/preup.xsl line 41 element import
xsl:import : unable to load /usr/share/openscap/xsl/oval-report.xsl
I/O warning : failed to load external entity "/usr/share/openscap/xsl/sce-report.xsl"
compilation error: file /usr/share/preupgrade/xsl/preup.xsl line 42 element import
xsl:import : unable to load /usr/share/openscap/xsl/sce-report.xsl
OpenSCAP Error:: Could not parse XSLT file '/usr/share/preupgrade/xsl/preup.xsl' [oscapxml.c:416]
Unable to open file /root/preupgrade/result.html
Usage: preupg [options]

preupg: error: [Errno 2] No such file or directory: '/root/preupgrade/result.html'
%In Place Upgrade CentOS 6.5 to 7.0 using preupgだからかな。これはCentOS6.8だし。 過去は忘れよう。
VPSの管理画面からCentOS7を新規インストールする
カスタムOSインストールガイド - CentOS7 / ScientificLinux7 / Fedora 24 この通りにする。最初の起動は時間がかかるけど焦らずに待つ。
CentOS Linux 7 (Core)
Kernel 3.10.0-327.22.2.el7.x86_64 on an x86_64インストール中にユーザーを追加しておいたので
rootログイン禁止,鍵認証有効,パスワードログイン禁止などをやっておく。
インストール
nginx インストール
sudo yum install http://nginx.org/packages/centos/7/noarch/RPMS/nginx-release-centos-7-0.el7.ngx.noarch.rpmsudo yum install nginxphp-fpm インストール
sudo yum install php-fpm/etc/php.ini を編集する
これを;date.timezone =
こうdate.timezone = "Asia/Tokyo";
/etc/php-fpm.d/www.conf を編集する
; Unix user/group of processes
; Note: The user is mandatory. If the group is not set, the default user's group
;       will be used.
; RPM: apache Choosed to be able to access some dir as httpd
user = nginx
; RPM: Keep a group allowed to write in log dir.
group = nginx起動 $ sudo systemctl start nginx $ sudo systemctl start php-fpm
WordPressインストール
「サーバーってなに?」~初心者でもよくわかる!VPSによるWebサーバー構築講座(1)
この通りのCentOS6, Apache, Mysql, WordPress構成は前回すでにやっているので
今回はCentOS7, nginx, mariaDB, WordPressとなるだけと侮っていたら
うまくいかない。
こんなのがerror-logに大量に残る
2016/08/04 07:17:44 [error] 4429#0: *6 "/var/www/index.html" is forbidden (13: Permission denied), client: 180.9.194.76, server: ak1211.com, request: "GET / HTTP/1.1", host: "ak1211.com"
2016/08/04 07:17:59 [error] 4429#0: *6 "/var/www/index.html" is forbidden (13: Permission denied), client: 180.9.194.76, server: ak1211.com, request: "GET / HTTP/1.1", host: "ak1211.com"
2016/08/04 07:18:46 [error] 4469#0: *1 "/var/www/index.html" is forbidden (13: Permission denied), client: 180.9.194.76, server: ak1211.com, request: "GET / HTTP/1.1", host: "ak1211.com"
2016/08/04 07:19:23 [error] 4489#0: *1 "/var/www/index.html" is forbidden (13: Permission denied), client: 180.9.194.76, server: ak1211.com, request: "GET / HTTP/1.1", host: "ak1211.com"
2016/08/04 07:21:09 [error] 4489#0: *2 "/var/www/index.html" is forbidden (13: Permission denied), client: 180.9.194.76, server: ak1211.com, request: "GET / HTTP/1.1", host: "ak1211.com"Permission denied だからとファイルとディレクトリのpermissionを何度確認しても問題ない。
イライライライラ
いいかげん熱くなってきたので頭を冷やそう
こんなサイト
自分とBaiduspiderとかGooglebotくらいしか見ていないから何時間落ちていても問題ないだろと開き直る。
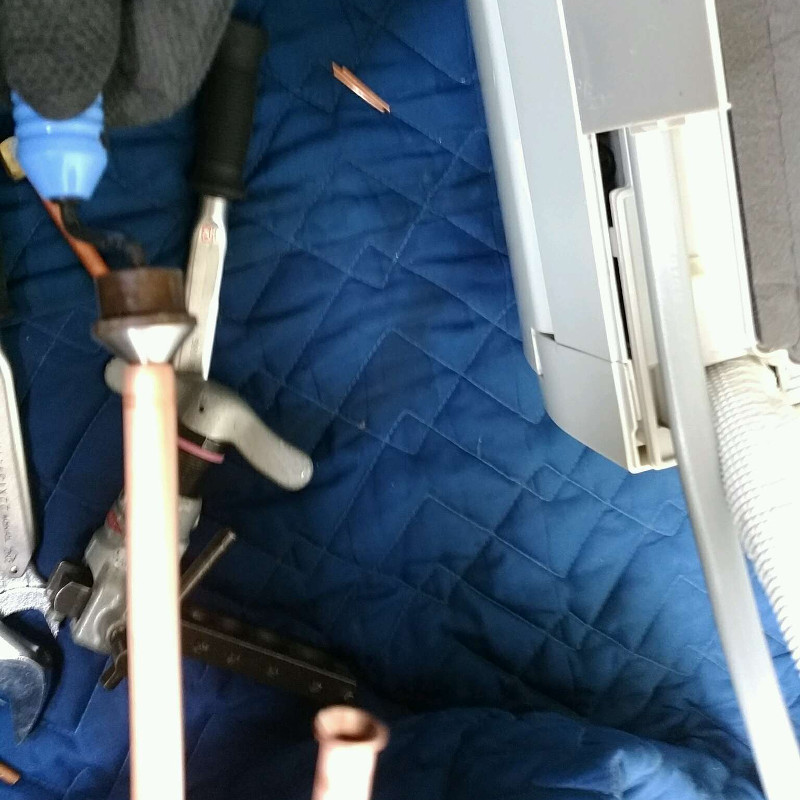
エアコンをインストール
**in・stall, in・stal / Instɔ´ːl, ((米+))-stɑ´ːl / (変化形の発音 installs ,installed ,installing ,instals ,instaled ,instaling ) 【原義:中に(in)置く(stall)】 ━━[動] (~s / -z / ;~・ed / -d / ;~・ing) ━(他) ❶ [SVO]〈設備・装置など〉を〔場所に〕に取り付ける, 据え付ける, 設置する〔in〕《◆put in より堅い語》 ▷ I must have an air conditioner installed in the house. エアコンを家に付けねばなるまい.
ジーニアス英和辞典 第5版
エアコンを家に付けねばなるまい.
暑いのは古いエアコンの効きが悪いせいだから, 冷房能力4.0kWのエアコンが丁度あったのでインストールを始める。
- 古いエアコンの撤去
- 取り付ける位置の確認
- 背面金物(バックハンガー取り付け)
- 冷媒銅管の切断
- この銅管カッターは内面にバリが出るので銅管のバリ取り
- ナットを銅管に通してフレア加工
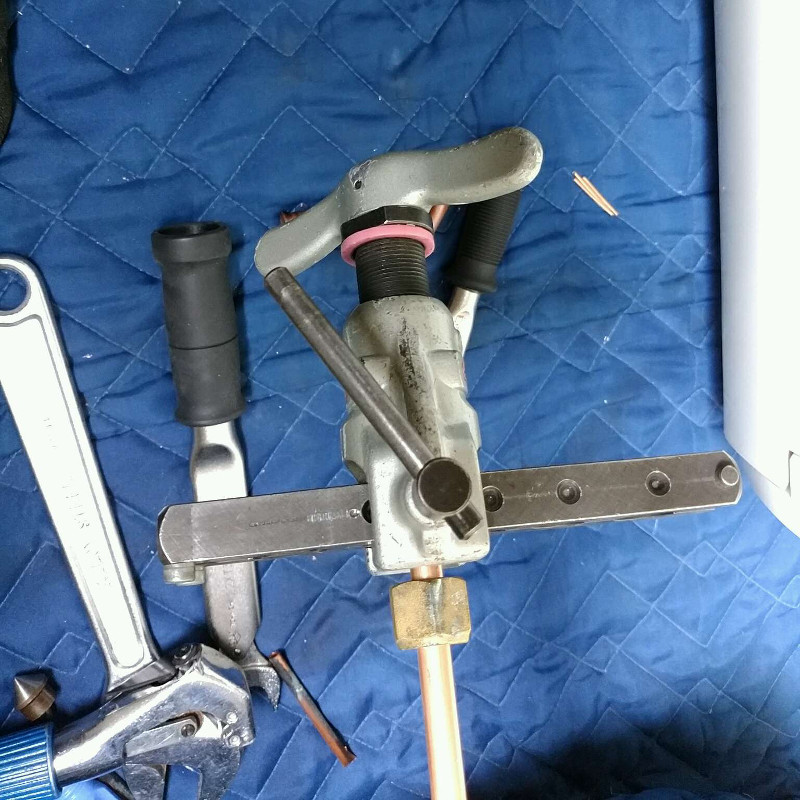

- フレア部にナイログを塗ってトルクレンチで適正トルクで締め付ける

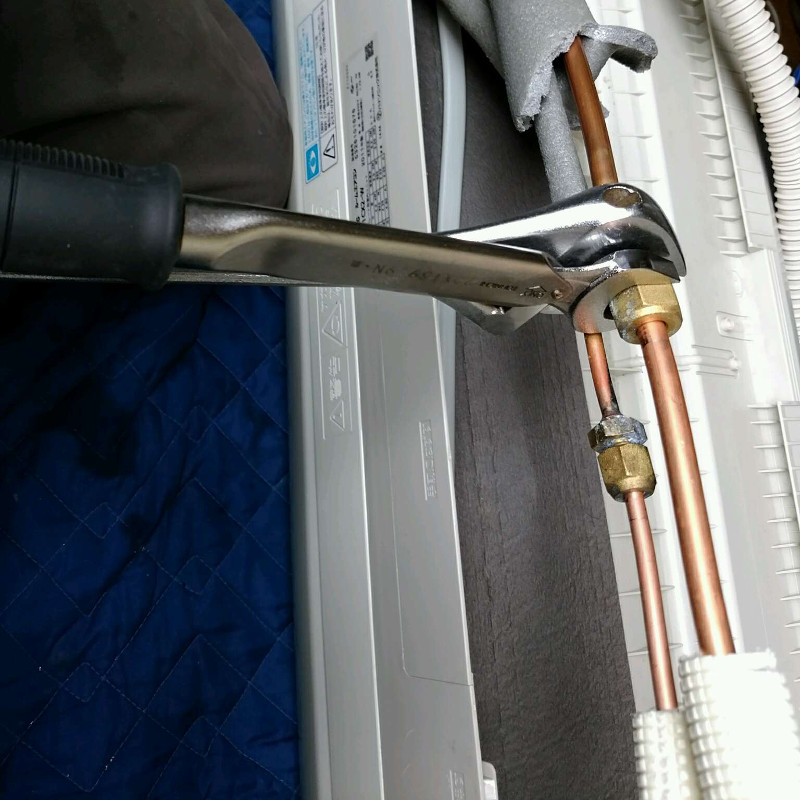
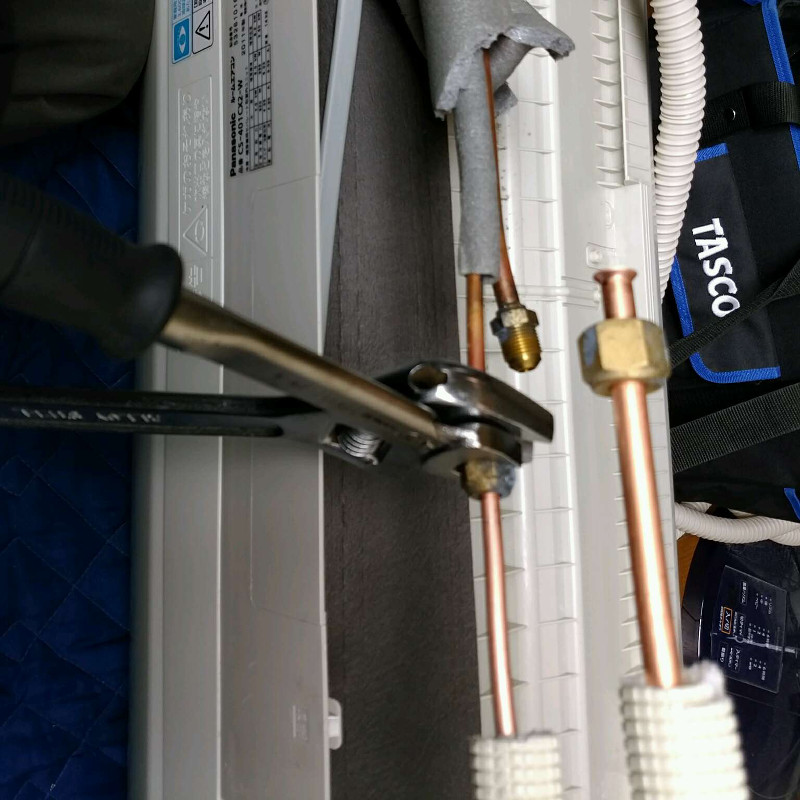
- 内外接続電線をストリップ
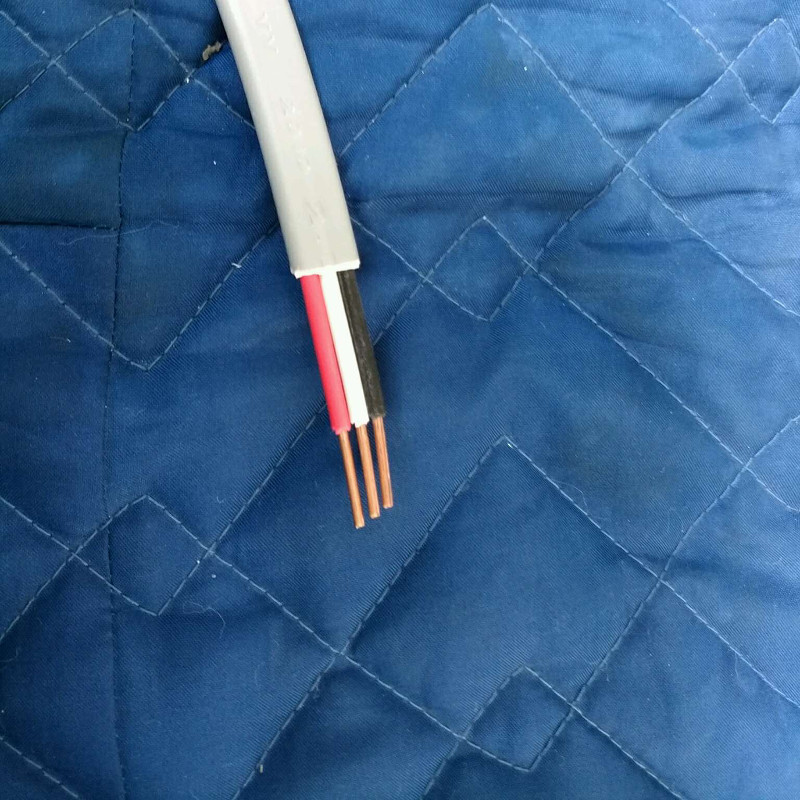
- 内外接続電線を差し込む
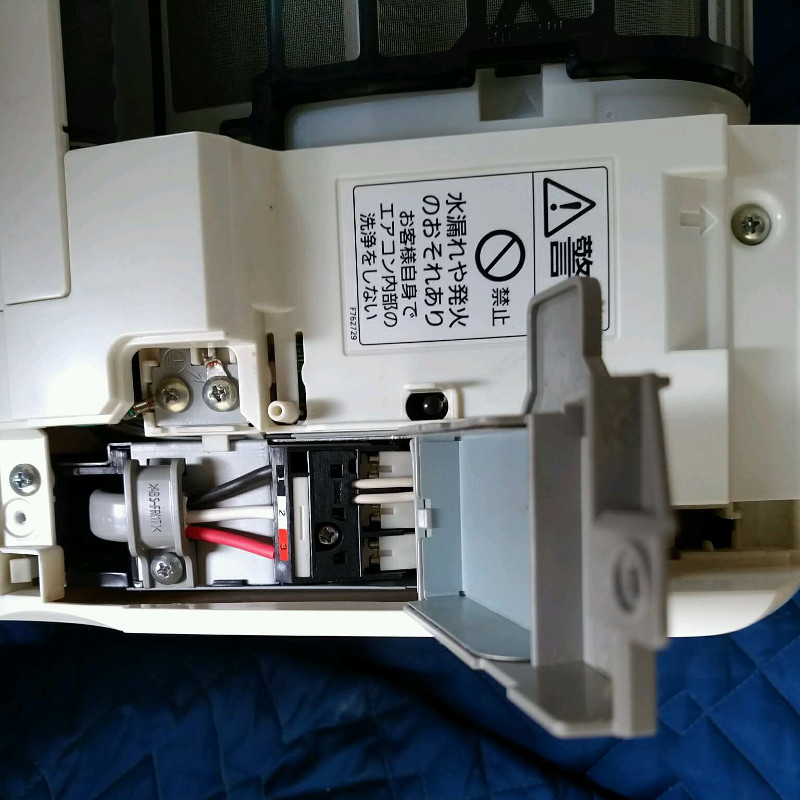
- 室外機の方でも同じ事をする
- 冷媒が入ってなかったので(新品でないから),2方弁3方弁全開で真空引き
- R410A冷媒を1.45kg量りながら入れる。
- 完了
SELinux が余計なことをしていた
# getenforce
Enforcing
# setenforce 0
# getenforce
Permissiveはい、これであっさり解決。 でも Permissive にしておくと負けた気分なので
# setenforce 1
# getenforce
Enforcing
# chcon -Rt httpd_sys_content_t /var/wwwこれで Enforcing でもOK それから
# semanage fcontext -a -t httpd_sys_content_t "/var/www(/.*)?"
# semanage fcontext -a -t httpd_sys_rw_content_t "/var/www/wordpress/wp-content(/.*)?"
# restorecon -R -vv /var/www/
# ll -Z /var/www
drwxr--r--. nginx nginx unconfined_u:object_r:httpd_sys_content_t:s0 html
drwxrwxr-x. nginx nginx unconfined_u:object_r:httpd_sys_content_t:s0 wordpressよくわからんがこうしておいたら動いた。
WordPress をバックアップからリストアする
WordPress公式のインポートツールでローカルから戻す ローカルにバックアップしておいたwp-content内のアップロードファイルはsftpで元に戻す
restoreconしておく
フルSSLへ
Let’s Encrypt で手軽に HTTPS サーバを設定する の通りにすませた。
$ git clone https://github.com/letsencrypt/letsencrypt.git
$ ./letsencrypt-auto certonly --webroot --webroot-path ~/ak1211.com -d ak1211.com過去の投稿のhttp://を//に置き換える
プラグインを使ったらいいみたいだけど、今回は手作業でコツコツと
firewalldの設定は?
$ systemctl status firewalld
● firewalld.service - firewalld - dynamic firewall daemon
   Loaded: loaded (/usr/lib/systemd/system/firewalld.service; enabled; vendor preset: enabled)
   Active: active (running) since 木 2016-08-04 03:15:09 JST; 1 weeks 1 days ago
 Main PID: 619 (firewalld)
   CGroup: /system.slice/firewalld.service
           └─619 /usr/bin/python -Es /usr/sbin/firewalld --nofork --nopid

$ sudo firewall-cmd --list-services --zone=public  --permanent
dhcpv6-client http https ssh何かした覚えはないけど動いてるからいい
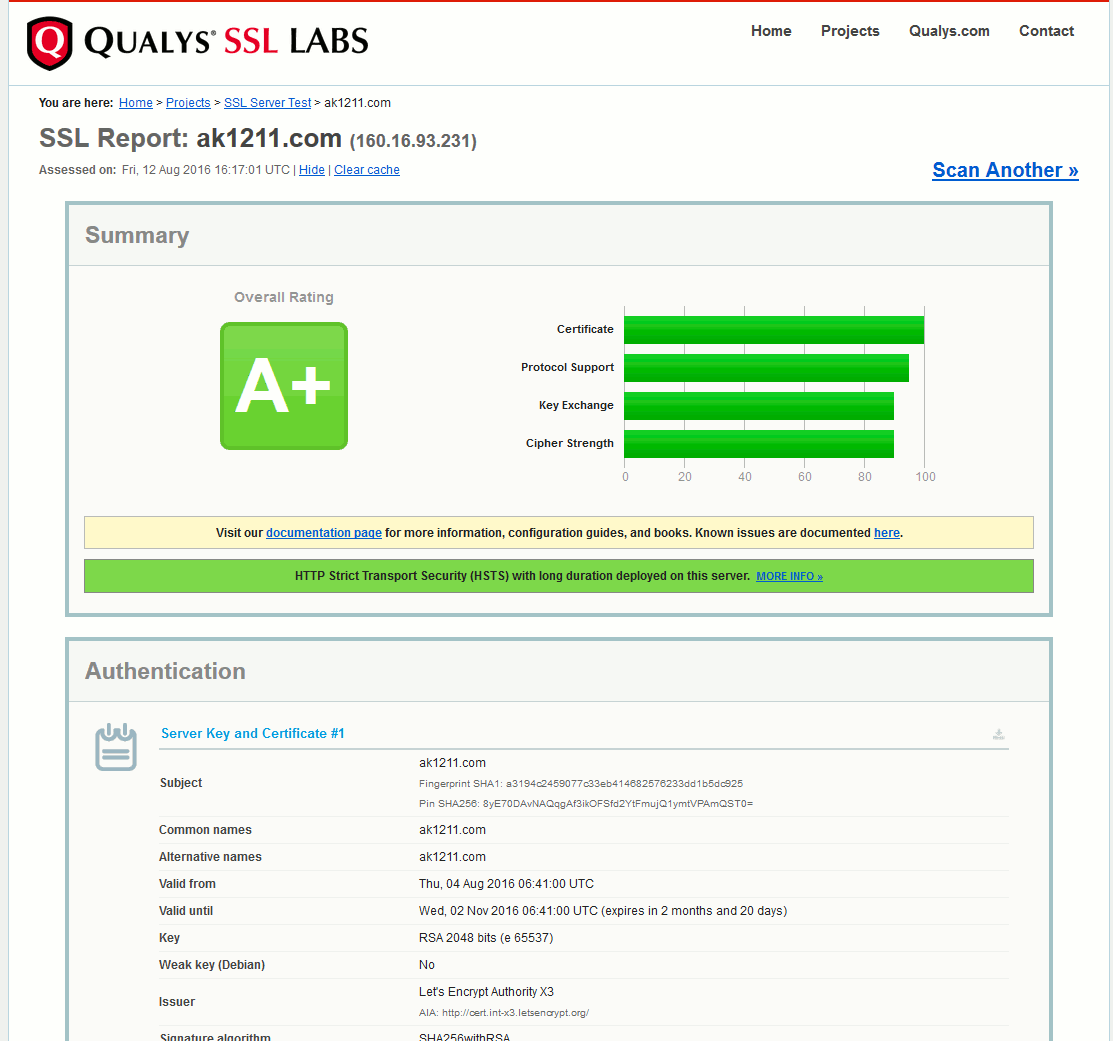
SSL Server Test
最後に
httpsのサイトをGoogleサーチコンソールに登録しておく。 PageSpeed Insightsで 「サーバーの応答時間を短縮する」が出てくる。
メモリ512MでフルSSL化は無理があったかも。
コメント